Promotional Products by Vistaprint – Pricing Tool
During my time at Vistaprint, I focused mostly on researching different parts of the web and mobile experience. However, with the launch of Promotional Products by Vistaprint, I had the chance to demonstrate some design and prototype skills. This project, conducted in collaboration with Amanda Carlson, ended with the concept on the final production website.
The Problem
Vistaprint’s new mass customization platform allows for small businesses and consumers from across the globe to create products that use their own logo and text. The website that will allow them to do this will hold many more SKUs than Vistaprint, which poses interesting constraints as well as benefits; some items have a minimum order quantity and there is variable pricing depending on the item and quantity purchased. Basically, the more of an item you buy, the lower the cost per piece. How do we adequately show this information to the customer, given that current competitors use a “price bucketing” system for their discounts?
Customer Goals
- “I have a budget for my purchase. How many items can I buy?”
- “I need a specific quantity of an item. How much will this cost?”
- “I have some flexibility, but I am limited on the maximum price per piece. What can I purchase for the quantity I need?”
Application/Business Requirements
- Show price per piece
- Show total cost based on entered quantity
- Communicate what the minimum order quantity is for the item is, or if there is none
- Show the lowest possible price per piece at the correct quantity
- Give some clarity on how the pricing model works (key differentiator)
- Communicate the lack of set up fee (key differentiator)
Process
Once I understood the business and customer goals for the project, I began to go through the following steps with my colleague on the project:
- Conduct a design studio exercise to sketch out ideas and determine first iterations
- Create annotated wireframes to present to stakeholders for approval before moving forward
- Turn wireframes into low-fidelity prototypes that will be used during testing
- Conduct research sessions with the live production site and concepts for this pricing modal.
- Offer recommended next steps to the design and development team.
Design Studio
Tools: Whiteboard
During the design studio portion of the project, my colleague and I went through different iterations on the whiteboard and discussed the ramifications of each. We gave each other time to come up with our own sketches, presented them to each other for feedback, and refined based on what we heard. From this we came up with four iterations that we ended up presenting to our stakeholders that solved for customer goals in different ways.

Wireframes
Tools: Axure, Powerpoint
Each sketch was digitized into a wireframe that was annotated and presented to stakeholders with a list of pros and cons about each design. A sample look at the slide deck for this conversation is below.

Prototype and Testing
Tools: Axure, Camtasia, Webex
Each of the four variations presented to stakeholders were then turned into interactive, low fidelity prototypes to be tested during the next round of research for this project. You can see the interactive prototype here (please message me for the password).


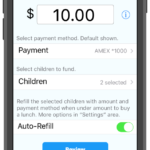
Result – Live Software
After recommending an approach for stakeholders and the development team to follow. A combination of “winning” designs was created and pushed to production. You can see the pricing pop (now a widget) live at https://www.promotique.com.

Lessons Learned
This was the first project I got to work on where I was able to truly focus on both the research and design sides of the UX coin. With the help of my colleague (a more experienced design practitioner), I was able to take what I knew about our customers and our business constraints to come up with a better way to show pricing. I learned more about how to work closely with PMs and developers when my designs were being critiqued and required changes. This was also my introduction to using Axure’s robust prototyping functionality to make something that would animate and calculate variables properly. Once that part was done, I was able to jump back into my routine for planning and executing research!